Wednesday 16 April 2014

Layers

AX 2012 Layer's
There are three layers available only to Microsoft to deliver the base application. (The xxP layer indicates the patch layer for each application object layer).
SYS, SYP:- System layer: The standard application is developed in this lowest layer. This includes the core application and the localization for most countries.
GLS, GLP :- Globalization layer: Includes features developed for some countries that were not yet moved into the SYS layer.
FPK, FPP :-Feature Pack layer: Includes industry feature packs that are controlled by Microsoft.
There are three layers available to partners and ISVs.
SLN, SLP :- Solution layer: Includes Microsoft endorsed industry solutions.
ISV, ISP :- Independent Software Vendor layer: Includes generic or vertical solutions developed by ISV's.
VAR,VAP :- Value Added Reseller layer: Includes multi-customer solutions developed by VAR's.
There are two layers available to both partners and customers who have a license to access the AX source code.
CUS, CUP :- Customer layer: Includes customer specific functionality.
USR, USP :- User layer: Includes installation specific functionality and customizations.
Tuesday 15 April 2014

History of AX

998 - Axapta 1.0 is released in March.
  • Released in the US and Denmark
  • Financial, trade, inventory management, logistics and production, Microsoft SQL Server 6.5
1998 - Axapta 1.5 - Early release in Norway, Sweden, Germany, UK, Netherlands, Austria, Switzerland, Belgium Spain and the European Union.
  • Publishing Manager
  • Call COM
  • Service Pack technology
  • Microsoft SQL Server 7.0
1999 - Axapta 2.0 - July:
  • Project Accounting module
  • WMS
  • External OLAP
  • Option Pack concept
  • ActiveX support
  • COM-connector and an early release of Axapta Object Server
2000 - Axapta 2.1 - January: Market demands from Germany, Austria, Switzerland and Spain.
  • Web tools and CSS (The first WebApp)
  • Microsoft SQL Server 2000, database log.
  • Receives Microsoft Windows 2000 logo.
2000 - Axapta 2.5 – December: Complete Web applications development environment.
  • Auto upgrade tool
  • ESS (Project)
  • Banking
  • First step of Load’n’Go
  • OLAP within Axapta
  • XML support
  • FA to Denmark, Austria and UK. Domains and ASP support
  • DBCS Support.
2001 - Axapta 2.5 Market Pack – October: Released in France and Italy.
  • Marketing Automation (CRM)
  • Commerce Gateway
  • Product Builder (Web application as well), training
  • Event Management (Web application as well).
2002 - Microsoft Axapta 3.0 - October:
  • Microsoft Axapta Enterprise Portal, intercompany collaboration.
  • New security and configuration keys.
  • Expanded geographical reach (more countries).
  • Demand planning.
  • Enhanced partner productivity tools.
2006 - Dynamics AX 4.0  - March:  The seventh major Axapta release brought with it an updated look and feel. As the first version that Microsoft was involved in from the beginning it attempted to integrate better with existing Microsoft technologies.
  • AOS became a true Windows service
  • .Net business connector was provided
  • CLR Interoperability was introduced
  • XML data exchanges were supported through a set of code classes (Application Integration Framework)
  • Full Unicode support was introduced
  • Service Management module.
2008 - Dynamics AX 2009  - June: Originally named AX 4.1, later renamed to AX 5.0 (and finally AX 2009), the eighth major release of Axapta brings with it yet more improvements to the UI. This new version adds role-based concepts to both the Enterprise Portal and windows clients, support for timezones (utc), a new Site inventory dimension, and Enterprise Portal development through Visual Studio projects.
2011 - Dynamics AX 2011  - Q1: Sometimes dubbed AX 6, it is said to include additional improvements to the user interface and application enhancements focused on specific industries like Retail, Media & Entertainment, and Public sector. Originally AX 2011 was due to be released toward the middle of 2010, but this has since been put back to Q1 2011.

User RecordInsertList

 int                             i;
    MyInvoiceInsertOverriden        myInvoiceRecord;
    int                             startTime, endTime;

    // Notice that the second parameter is being passed as true to inform that
    // the insert method must be skipped
    RecordInsertList invoicesToBeInserted = new RecordInsertList(tableNum(MyInvoiceInsertOverriden
    for (i = 0; i < 10000; ++i)
    {
        myInvoiceRecord.InvoiceAmount = (i + 1) * 100;
        myInvoiceRecord.CurrencyCode = 'REA';
        myInvoiceRecord.Qty = (i + 1) * 10;
        myInvoiceRecord.InvoiceId = int2str(i + 1);

        invoicesToBeInserted.add(myInvoiceRecord);
    }

    invoicesToBeInserted.insertDatabase();

Chart of Accounts


Realized loss/Profit – a/cs ( GL Exchange rates – Posting tab) – Ex : we send Customer Invoice , if exchange rate value is different  . Accounts we use when we have ex. Exchange rate is one today and different from the payed date.  If we have loss/profit due to currenty , Then we use these a/cs.

Our company currency is set , Basic >> Company Information >> Other tab >> currency

Secondary Currency : Suppose we have head quarters then we set , Secondary currency to Head quarter currency when it is different from Company currency.

Periods :
When we run ERP system we need to have periods , to Posting ..
To generate annual report / half yearly ..
GL >> Setup >> Periods .
We can open for posting , for memebers with User group – Admin ( we can set this in Module Status Tab ) in Periods form.
Once period is closed we cannot reopen .

We can create Create New Fiscal Year … ( By pressing button in Periods).
Split up Periods at time  ( divide Period) – In my case, when 2 different companies are merging we get situation like this .


Date intervals :

When we want Financial statements, we use Date intervals.
Set up of different intervals Eg.
·        This month
·        Prior month
·        Q1, Q2, Q3, Q4.
·        This year
·        Prior year
·        A specified period – First 5 months of year

GL >> Setup >> Periods >> Date Intervals ( get automatically when installed AX).  We get values based on present date.


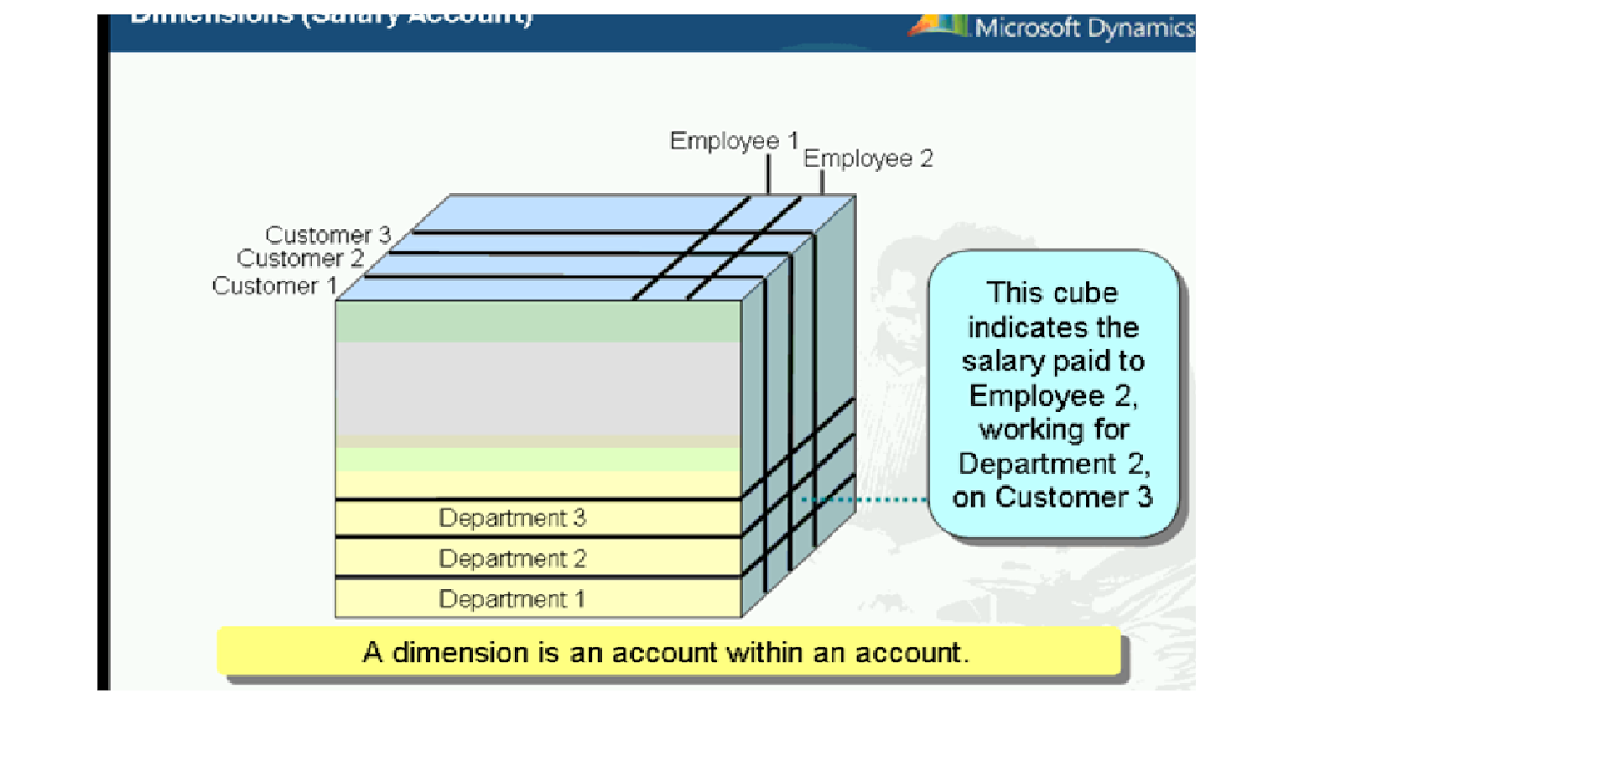
Dimension :
 To minimize the no.of a/cs .. Dimension is a/c with the main account.


Basic >> Dimensions …   ( Department, CostCentre, Purpose)

We can set up Default dimensions for a/c  in Accounts …

Dimension Focus :  Defines in which order dimensions and accounts should be printed.
            GL >> Setup >> Financial Statement >> Dimension Focus .  ( to set the sequence of showing … )

Chart Of Accounts


Ø  Chart of accounts is first and one of the most important . No other module will work without the Chart of Accounts.
Ø  Account Type ( Header – Just Words, Header, page header, Empty Header, Total … we cannot post ) ,  Revenue , Profit and Loss, Balance – Balance a/c , Cost – for Cost Accounts.
Ø  Locked in Journal Check box( these accounts can only be used, for exact automatic transactions ( posting invoice , ).
Ø  We can set whether a/c is for credit or debit ( by setting DB/CR proposal – Debit / credit , DB/CR requirement, Balance Control.

Ø  If we set , then we cannot use this a/c for other. Suppose set for debit, then can be used only as debit a/c.

Index

Index :
An index is a table-specific database structure that speeds the retrieval of rows from a table. Indexes are used to improve the performance of data retrieval and occasionally to ensure the existence of unique records.
There are two types of indexes: unique and non-unique. Whether an index is unique is defined by the index's AllowDuplicates property. When this property is set to No, a unique index is created.
System Index
Microsoft Dynamics AX requires a unique index on each table so if there are no indexes on a table or all the indexes are disabled, a system index is automatically created. The system index is created on the RecId and DataAreaId fields if the DataAreaId field exists. 

If there are indexes on a table but none of them are unique, the runtime estimates the average key length of the existing indexes, chooses the index with the smallest key length and appends the RecId column to create a unique index.
Create Index :
AOT >> Locate Table >> RC Indexesnode , New Index. RC NewField. ( In Property – Select DataField).
Order – for sorting, Allow Duplicates – No. Enable – No , when you disabled index it is deleted from the database.
Table Keys :
Property
Description
PrimaryIndex
The drop-down list contains the surrogate key plus every index on the table that has its AlternateKey property set to Yes.
CreateRecIdIndex
This property controls whether the system creates a unique index on the RecId field. The default value is Yes. This is the basis of the surrogate key.
No other field is added to this index, not even DataAreaId.

ReplacementKey
The drop-down list contains every index that has its AlternateKey property set to Yes.
You might change the default blank value to an index whose field values within each record provide a name or other moniker that is meaningful to people. If a ReplacementKey is chosen, its fields can appear on forms to helpfully identify each record.
The ReplacementKey should be a set of fields that represent the natural key.

ClusterIndex
The ClusterIndex value is given to the underlying Microsoft SQL Server database system as a performance tuning choice. This choice generally controls the physical sequence in which the records are stored in the underlying database.

he following AOT image highlights the table properties that are related to keys.
Properties of the CustTable table
Alternate Key
A table can have several alternate keys. Any one alternate key can switch to being the primary key, if the alternate key is comprised of only one field.
Property
Description
AllowDuplicates
No means that the combined fields of the index must together make a value in each record which no other record has.
AlternateKey
Yes means that other tables can create foreign key relations that reference this key, as an alternative to referencing the primary key.
Indexes with two or more fields cannot have their AlternateKey property value set to Yes.
ValidTimeStateKey
A key that is marked as a valid time state key is not a candidate key for child tables to reference in their foreign key relations. Instead, this key is meant for managing date effective data in its own table.
The default is No. This field can be Yes only if the ValidTimeStateFieldType property is Yes on the table. Yes means this key contains the ValidFrom and ValidTo fields.
The ValidTimeStateKey property cannot be set to Yes when the AlternateKey property is set to No.

Other Terminology for Keys :
Term
Description
foreign key
In Microsoft Dynamics AX, an AOT node under MyTable > Relations represents a foreign key. For more information, see the previous Relations section in this topic.
natural key
A key whose value has meaning to people. Most replacement keys are natural keys.
surrogate key
A key whose value has no meaning to people. A large number generated by the system, such as RecId, could be a surrogate key.
unique key
A broad term that applies to primary keys and to alternate keys. It does not apply to foreign keys. This term emphasizes that all values for a given key must be unique within one table. All fields in a unique key must be not-nullable.


Full Text Index :
A full text index contains location information about each significant word in a string field of a table. Some queries can use this information to run more efficiently and complete much sooner. These are queries that search for words that are embedded in the middle of string fields.
Surrogate Key
The Surrogate (1) definition relates to a data model rather than a storage model and is used throughout this article. See Date (1998).
An important distinction between a surrogate and a primary key depends on whether the database is a current database or a temporal database. Since a current database stores only currently valid data, there is a one-to-one correspondence between a surrogate in the modeled world and the primary key of the database. In this case the surrogate may be used as a primary key, resulting in the term surrogate key. In a temporal database, however, there is a many-to-one relationship between primary keys and the surrogate. Since there may be several objects in the database corresponding to a single surrogate, we cannot use the surrogate as a primary key; another attribute is required, in addition to the surrogate, to uniquely identify each object.
a surrogate should have the following characteristics:
the value is unique system-wide, hence never reused
the value is system generated
the value is not manipulable by the user or application
the value contains no semantic meaning
the value is not visible to the user or application
the value is not composed of several values from different domains.


EP

Docs :
 https://drive.google.com/file/d/0Bz2gDlDZfIivejhTcWRTeExfSmc/edit?usp=sharing
https://drive.google.com/file/d/0Bz2gDlDZfIivdWNzUUZuOFZUNHc/edit?usp=sharing
===================================================================
http://learnax.blogspot.in/2012/01/dynamics-ax-2012-workflow-development.html -- Workflow

http://vimeo.com/26902748
http://www.youtube.com/watch?v=v13kASc5XKg

Main Change 2012 :
-> Whole presentaion layer out of Morphx is removed from AX and moved to VS. Adv : It gives control to over all .Net controls and 3rd party controls.

Architecture of EP :
1. Users who use EP
2. Browsers
3. Once log on to EP - MOSS 2007- MSoffice sharepoint Service 2007 .Windows Share point - 3.0 . diff webparts, outer box webparts, there is no limitation on Webparts used in EP .

User controls webpart - is a web part which allow to host any standard ASP.net User control.


Key steps as developer : Morphx - Business Logic and data modeling .
create dataset,table , create classes in Morphx, VS - Create User control, Go to share point and post User control in User control webpart.

User Control : Collection of UI Controls - like lookup, popup,Grid, form  or any standard AX controls and third party control( silver light control )

Outerbox Credit Control - Ex demo - to show customer


Base of all these is the AX data source control - - .net Business connector - AXDatasource control - It allows u to access all meta data and Data  in form of EPI . These EPI are consumed by AX data source control which provides access  to data to all UI Control.

AX Datasource - We have to build our Databinding store on top of ASP.net datasource .
ie., As ASP.net have Databinding store , Data source - AXData source ctrl, DataBound- AXBoundField


Reports Webpart : Allows you to host any report built in Reporting Services.

Guiding Principle when came to EP architecture:

1. we shld have programing model which is similar to that of AX 2009 client. We dn't want steep curve for the developer in building EP apps.  The articrafts built in AOT for AX EP, are very similar to accounting parts in client. ex; webmenu similar to menu.

2.we have AOT -Data modeling VS - VS Ctrl, Share point - To create Web pages We want to unify all artificants to single AOT store. Help to have single security model that can be  to client as well as EP.Since everything sit in AOT , we can apply same security model as Client articrafts.

Advantages over X++ Based framework over ASP.net Based Framework ie., Web UI framework:

1. If you can built a functionality on Standard ASP.net web application you can develop in EP. There is no stoping of using any controls there.

2.  Built of AJAX in to the framework itself. if you want use webpart to host our user control , we dn't want to worry how to integrate.. We can use AJAX on EP.

3. Extend

4. Managed Code developement - We need to use X++ for UI rendering but now we are using ASP.Net for UI rendering.

Advantages over traditional ASP.Net Solution :
=============================================
1. Data binding everything is built in framework itself .. so no need to worry in EP
2. Field group is specific to AX not ASP.Net . We can access field group in EP even. At design time it is single field in markup and at run time it would easily explore to multiple fields .

Nodes which are specific to EP :
==============================
1. Dataset node
2. Web
   i) Web Menus
   ii) Web menu Itms
   iii) Files - Web user Controls are saved.
   iv) Page Definition node - where all share point pages are saved.
   v)  Web content >>  managed - have all user controls.
Difference b/w datasets and Form data sources is Design is missing in Datasets.

First Demo : Customer Listing on to EP with out writing any single code :

1. Create Data Set - EPDevWebinar(name) - Add Data source - CustTable .
2. Go to EP ie., VS File - NEw Web site > >DYnamics AX Web Project >> Name - EPDEVWebinar.
3. RC on EPDEVWebinar >> Add New Item >> Dynamics AX User Control>>EPDEVwebinarUC1(name) >> RC on it >> Add to AOT.
Imp:  We not only add templates but integrated AX with VS.
4. Check AOT>> WebFiles >> and Webcontent >> Managed >> we find the user control .
5. Go to design mode in VS for Control .
6. Bring AX Data source on to the design and Properties ( EPDevWebinar - data set we created in AOT).(Click refresh Schema if you dn't find the Dataset created.
7. Drop Grid and set AXDatasource1 which we added before in design.
8. Edit columns >> pick fields needed . Save it.
9. Go to EP >> click the URL of EPSite .  ( create new page how it renders in to EP)
10. Site Actions >> Create Page >> New Part Page >> To create new page , create New Web Part Page.
11. Wepage >> WebPartpage >> name EPDEVWebinar Page1, Document Library - Enterprise Portal.

12. under Dynamics Infolog Webpart - Add new web part , select Dynamics user control webpart >> Click modify select the user control developed in VS.
(ONce you saved User control on VS - Not only saved to AOT, it deployed to EP )

Demo : 2 - Custom Filter :
==========================
Add Employee ID  field in Grid.
We neeed to add 2 methods in Dynamics AX.
Go to Data set EPWebinar we created, add two methods.
1. Void AllCustomers()
{
querybuilddatasource qdbs;
QueryBuildRange qbr;
;
qdbs = CustTable_q.dataSourceName(CustTable_ds.name());
qdbs.clearRange(fieldnum(CustTable,EmpId);
CustTable_ds.executeQuery();
}
2. Void MyCustomers()
{
querybuilddatasource qdbs;
QueryBuildRange qbr;
;
qdbs = CustTable_q.dataSourceName(CustTable_ds.name());
qdbs.clearRange(fieldnum(CustTable,EmpId);
qbr - qbds.addRange(fieldnum(CustTable, EmpId));
qbr.value(SysQueryRangeUtil::CurrentEmployeeId(); // Employee for the logged in User .
qbr.status(RangeStatus::Open);
CustTable_ds.executeQuery();
}


Go back to VS >> refresh Schema in Grid . Go to Source and Add Below code.

Go to design mode - Properties of Click ,Items (Click Add - All , My) AutoPostBack - True. Go to Event - SelectIndex Changed.

We need to Administration >>  refresh AOD in EP environment.

Demo : 3 : how you can use standard asp.net template :
====================================================
Add one more field Terms of payment( paymentTerm Id) in grid.
we want to display images or icons tht represent the values for different values of Payment ID. - M15, M30 ...

1. Select the PaymentTermId - click convert to template field ...
When you see the code regarding the control, we have two codes - EditItemtemplate - When grid is shown in edit mode -Dynamic change, ItemTemplate - When grid is shown in view mode -static
2. Change Item Template Code with Image and Label.
Having two controls, to control visibility based on the value.

Demo 4 : Date Control , how it is shown in EP
============================================
1. Change the mode of the grid , AllowEdit = "true"
2. Add field  Appeciation date.  - A date field is brought in grid.
If we want to have Date field, such that we can have 3 drop downs- Day of month,month, Year - >

Demo : 5 Web Associations - how to connect two  webparts in a page and how they can to one another
1. Add new user control - EPDevWebinarUC2>> Add to AOT.

Add two methods under data soruce:
1. dispaly NumberOfRecords TotalOrders(CustTable _custTable)
{
Salestable salesTable;
;
select count(recId) from salesTable where salesTable.InvoiceAccount == _custTable.AccountNum &&
(salesTable.salesStatus == SalesStatus::Backorder ||
salesTable.salesStatus == SalesStatus::Deliverd ||
salesTable.SalesStatus == SalesStatus::Invoiced);
return salesTable.Recid;
}
2. dispaly NumberOfRecords openSalesOrders(CustTable _custTable)
{
Salestable salesTable;
;
select count(recId) from salesTable where salesTable.InvoiceAccount == _custTable.AccountNum &&
(salesTable.salesStatus == SalesStatus::Backorder ||
salesTable.salesStatus == SalesStatus::Deliverd);
return salesTable.Recid;
}
2. Add Data source  to user control - EPDevWebinar - Data SetName - EPDevWebinar.Click refresh schema - to get newly added methods.
Add AX form - Data SourceID - AxDataSource1, DataMember - CustTable_Current, DatKeyname - AccountNum_name Name - a, AXGrid.
Add group to Form - add Fields - Open sales orders, Total sales orders.

Copy the fields ( display methods ) if code is not added in source code.

Add User control to the new web part >> modify the property ,

Webpart Role -
none - not going to participate in any connections, provider - provide the context, consumer - consume the context.

Change the other user control to Provider.

Modify Shared webpart >>
Connections >> send AXControlList to >> Dynamics UserControlWebpart[2].

Demo 6: Chart :
=================

Add Chart Control to Design .

Set the data source.  - to datasource already created .

Click Series.
Series - add two fields - total orders and Open orders.
click >>
Char area - 3d property to - true.
If you want to add legend... we can do it.


Demo : 7  To create Insert Edit form :
=======================================
Create a user control..
add >> data source , Form. To form Add Multi section, add ax sections. to each section add group.
They allow you to have collapsable control to the form.
Bound field - to add fields.
Bound Field Groups - to add Field group.

To have view only, edit or insert mode to form ,
below is the code.


Tree Control

 http:\\axmas.blogspot.in\2012\11\using-tree-control.html 

Using a tree control

1. In the AOT, create a new class named BudgetModelTree with the following code:
class BudgetModelTree
{
    FormTreeControl tree;
    BudgetModelId modelId;
}
public void new(FormTreeControl _formTreeControl, BudgetModelId _budgetModelId)
{
    tree = _formTreeControl;
    modelId = _budgetModelId;
}

public static BudgetModelTree construct(FormTreeControl _formTreeControl, BudgetModelId_budgetModelId = '')
{
    return new BudgetModelTree(_formTreeControl, _budgetModelId);
}
private TreeItemIdx createNode(TreeItemIdx _parentIdx, BudgetModelId _modelId, RecId _recId)
{
    TreeItemIdx itemIdx;
    BudgetModel model;
    BudgetModel submodel;
    model = BudgetModel::find(HeadingSub::Heading, _modelId);
    itemIdx = SysFormTreeControl::addTreeItem(tree, _modelId + ' : ' + model.Txt, _parentIdx, _recId, 0,true);
 
    if (modelId == _modelId)
    {
        tree.select(itemIdx);
    }

    while select submodel
    where submodel.ModelId == _modelId && submodel.Type == HeadingSub::SubModel
    {
        this.createNode(itemIdx, submodel.SubModelId, submodel.RecId);
    }
    return itemIdx;
}

public void buildTree()
{
    BudgetModel model;
    BudgetModel submodel;
    TreeItemIdx itemIdx;
    tree.deleteAll();
    tree.lock();
    while select RecId, ModelId from model
    where model.Type == HeadingSub::Heading
    notExists join submodel
    where submodel.SubModelId == model.ModelId &&
    submodel.Type == HeadingSub::SubModel
    {
        itemIdx = this.createNode(FormTreeAdd::Root, model.ModelId, model.RecId);
        SysFormTreeControl::expandTree(tree, itemIdx);
    }
    tree.unLock(true);
}

2. In the AOT, open the BudgetModel form's design, expand the Body group, then
expand the GridContainer group, and change the following property of the
BudgetModel grid control:

Property  Value
Visible     No

3. Create a new Tree control right below the BudgetModel grid with the
following properties:

Property    Value
Name        Tree
Width        Column width
Height        Column height
Border       Single line
RowSelect Yes

4. Add the following code to the bottom of the form's class declaration:
BudgetModelTree modelTree;

5. Add the following code to the bottom of form's init():
modelTree = BudgetModelTree::construct(Tree);
modelTree.buildTree();

6. Override selectionChanged() on the Tree control with the following code:
public void selectionChanged(FormTreeItem _oldItem, FormTreeItem _newItem, FormTreeSelect _how)
{
    BudgetModel model;
    BudgetModelId modelId;
    super(_oldItem, _newItem, _how);
    if (_newItem.data())
    {
        select firstOnly model
        where model.RecId == _newItem.data();
   
        if (model.Type == HeadingSub::SubModel)
        {
            modelId = model.SubModelId;

            select firstOnly model
            where model.ModelId == modelId && model.Type == HeadingSub::Heading;
        }
    BudgetModel_ds.findRecord(model);
    BudgetModel_ds.refresh();
    }
}

7. Override the delete() method on the BudgetModel data source with the
following code:

public void delete()
{
    super();
    if (BudgetModel.RecId)
    {
        modelTree.buildTree();
    }
}

8. Override the delete() method on the SubModel data source with the
following code:

public void delete()
{
    super();
    if (SubModel.RecId)
    {
        modelTree.buildTree();
    }
}

9. Add the following code to the bottom of the write() method on the BudgetModel
data source:
modelTree.buildTree();

10. Override the write() method on the SubModel data source and add the following
code to its bottom:
modelTree.buildTree();

11. In the AOT, the BudgetModel form should look like the following screenshot: