Thursday, 20 December 2018

Importing .bacpac file

How restore data base using .bacpac  file.

Open the command prompt and type below command:

C:\Program Files (x86)\Microsoft SQL Server\140\DAC\bin>SqlPackage.exe /a:Import /sf:"C:\Temp\DBBackup\test_12132018.bacpac" /tsn:localhost /tdn:AxDBUMA

File Location : C:\Temp\DBBackup\test_12132018.bacpac
UMA - is the company we are going to import.

How to calculate charge (MarkupTrans) amount from code

Calculate markup trans for Sales order including Tax

  static Amount calculateMarkupTrans(SalesId _salesId) { AmountCur markupAmount,headermarkupamt,linemarkupamt,totTaxAmountCur,lineamount; MarkupTrans markupTrans; CurrencyExchangeHelper curCurrencyExchangeHelper; SalesTable salesTable = SalesTable::find(_salesId); SalesLine salesLine; SalesTotals salestotals; container cont; // Code to calculate total tax for sales order inlucing charges tax--> salesTotals = SalesTotals::construct(salesTable, SalesUpdate::All); salesTotals.calc(); cont         = salesTotals.displayFieldsCurrency(salesTotals.currencyCode()); totTaxAmountCur = conpeek(cont, TradeTotals::posTaxTotal()); // Code to calculate total tax for sales order inlucing charges tax<-- // Code to calculate total Charge for sales order header--> while select markupTrans where markupTrans.TransTableId == salesTable.TableId &&markupTrans.TransRecId == salesTable.RecId { markupAmount = markupTrans.Value; if (markupTrans.CurrencyCode != salesTable.CurrencyCode) { // To automatically conver amount Markup::calcMarkupAmount can be used curCurrencyExchangeHelper = CurrencyExchangeHelper::newExchangeDate(Ledger::primaryLedger(CompanyInfo::findDataArea(markupTrans.company()).RecId), systemDateGet()); markupAmount = curCurrencyExchangeHelper.calculateAccountingToTransaction(salesTable.CurrencyCode, markupAmount, true); } headermarkupamt =headermarkupamt+markupAmount; } // Code to calculate total Charge for sales order header <-- // Code to calculate total Charge for sales order lines--> while select salesLine where salesLine.SalesId == salesTable.SalesId { while select markupTrans where markupTrans.TransTableId == salesLine.TableId &&markupTrans.TransRecId == salesLine.RecId { markupAmount = Markup::calcTrans(markupTrans, salesLine.SalesQty, salesLine.LineAmount); if (markupTrans.CurrencyCode != salesTable.CurrencyCode) { // To automatically conver amount Markup::calcMarkupAmount can be used curCurrencyExchangeHelper = CurrencyExchangeHelper::newExchangeDate(Ledger::primaryLedger(CompanyInfo::findDataArea(markupTrans.company()).RecId), systemDateGet()); markupAmount = curCurrencyExchangeHelper.calculateAccountingToTransaction(salesTable.CurrencyCode, markupAmount, true); } linemarkupamt = linemarkupamt+markupAmount; } } // Code to calculate total Charge for sales order lines<-- markupAmount = linemarkupamt+headermarkupamt;//Sum both line and Header Charges for Sales order // Calculate Charge lines tax if we get tax > 0 for sales order--> if(salesTable.InclTax == noyes::No && totTaxAmountCur >0)// Calculate Charge lines tax if we get tax > 0 for sales order { TaxGroupHeading taxgroup; TaxGroupData taxgroupdata; select * from taxgroupdata where taxgroupdata.TaxGroup == salesTable.TaxGroup; real taxpercent =taxgroupdata.ShowTaxValue(); markupAmount =markupAmount+(markupAmount*taxgroupdata.ShowTaxValue())/100;//Add tax amount to Charge lines when Salestable Includetax field is set to no. } // Calculate Charge lines tax if we get tax > 0 for sales order--> return markupAmount; }

Monday, 10 December 2018

Deleting duplicate records in Table through code in X++

static void DeleteDuplicate(Args _args)
{
Set fieldset = new set(types::Integer);

// create dictindex from unique index 

DictIndex dictIndex = new dictIndex (tablenum(PurchTable), indexnum(PurchTable,PurchIdx));

;

// these are fields from index

// add them to set

fieldset.add(fieldnum(PurchTable ,OrderAccount));

ReleaseUpdateDB::indexAllowDup(dictIndex);

// set allow duplicates

ReleaseUpdateDB::deleteDuplicatesUsingIds(tablenum(PurchTable),0,fieldset);

//reenable duplicates

ReleaseUpdateDB::indexAllowDup(dictIndex);

info("Deletion done");


}

Friday, 9 November 2018

Unit conversions

Unit Conversion:


UnitOfMeasureConverter_Product is product specific unit conversion. It lookups defined conversions in the following order:
  1. Use direct product-specific conversion, if one exists.
  2. Use a chain of two product-specific conversions through one base unit of measure, if one exists.
  3. Use a chain of product-specific conversions through two base units of measure, if one exists.
  4. Use a chain of one product-specific and one standard conversions through one base unit of measure, if one exists.
  5. Use a chain of product-specific or standard conversions through two base units of measure, if one exists.
  6. Execute the calculation algorithm for the standard conversions.
Meanwhile, UnitOfMeasureConverter::convert is just a wrap method that will call UnitOfMeasureConverter_Product if ProductId is provided. If no ProductId specify, it just do standard conversion.
static void Job_UnitConversion(Args _args)
{
    #define.itemId('M0018')
     
    //Method one
    UnitOfMeasureConverter_Product  unitConverter   = UnitOfMeasureConverter_Product::construct();    
    unitConverter.parmProduct(InventTable::find(#itemId).Product);
    unitConverter.parmFromUnitOfMeasure(UnitOfMeasure::unitOfMeasureIdBySymbol('kg'));
    unitConverter.parmToUnitOfMeasure(UnitOfMeasure::unitOfMeasureIdBySymbol('ea'));
    unitConverter.parmRoundAbsoluteValue(NoYes::No);
    unitConverter.parmApplyRounding(NoYes::No);
    print unitConverter.convertValue(1010);
    //Method two
    print UnitOfMeasureConverter::convert(1010,
            UnitOfMeasure::unitOfMeasureIdBySymbol('kg'),
            UnitOfMeasure::unitOfMeasureIdBySymbol('ea'),
            NoYes::No,
            InventTable::itemProduct(#itemId),
            NoYes::No);
    pause;
}

===============================================================================================

Unit Conversion Check AX2009 Vs AX2012

AX 2009
if(!UnitConvert::canConvert(this.inventTableModuleInvent().UnitId, this.SAB_ProdPickingUOM, this.ItemId))

AX 2012
unitConvFound = UnitOfMeasureConverter::canBeConverted(UnitOfMeasure::findBySymbol(this.inventTableModuleInvent().UnitId).RecId,                                                             UnitOfMeasure::findBySymbol(this.SAB_SalesPickingUOM).RecId,

                                                                   this.Product);

Thursday, 8 November 2018

Date and TimeCalculations

1) Apply Datetime Offset :

 private void applyDateTimeOffset(
        FieldId         _fieldId,
        TransDate       _baseDate,
        int             _dateOffset,
        RORDateUnit     _dateUnit,
        boolean         _applyDateOffset,
        TimeOfDay       _baseTime,
        int             _timeOffset,
        RORTimeUnit     _timeUnit,
        boolean         _applyTimeOffset,
        boolean         _hasSystemTime = false)
    {
        int         timeZoneDifference = (DateTimeUtil::time(DateTimeUtil::applyTimeZoneOffset(DateTimeUtil::getSystemDateTime(), DateTimeUtil::getUserPreferredTimeZone()))
                        - DateTimeUtil::time(DateTimeUtil::getSystemDateTime()));
        TransDate   rentDate = DateTimeUtil::date(DateTimeUtil::applyTimeZoneOffset(this.(_fieldId), DateTimeUtil::getUserPreferredTimeZone()));
        TimeOfDay   rentTime = DateTimeUtil::time(this.(_fieldId)) + timeZoneDifference;
 
        if (_applyDateOffset)
        {
            rentDate = RORRentalDateTimes::applyDateOffset(_baseDate, _dateOffset, _dateUnit);
        }
 
        if (_applyTimeOffset)
        {
            rentTime = RORRentalDateTimes::applyTimeOffset(_baseTime, _timeOffset, _timeUnit);
        }
 
        if (!rentDate && _hasSystemTime)
        {
            rentTime = rentTime + timeZoneDifference;
        }
 
        this.(_fieldId) = _hasSystemTime ? DateTimeUtil::newDateTime(rentDate, rentTime) : DateTimeUtil::newDateTime(rentDate, rentTime, DateTimeUtil::getUserPreferredTimeZone());
 
        this.modifiedField(_fieldId);
    }
=======================================================================
2) Check whether current date time exists in active calendar :

private boolean checkDateCalendar(FieldId _fieldId, CalendarId _calendarId = '')
    {
        boolean             ret = true;
        CalendarId          calendarId = _calendarId;
        WorkCalendarDate    workCalendarDate;
        TransDate           rentalDate = DateTimeUtil::date(this.(_fieldId));
   
        Query                       query;
        SysInfoAction_FormrunQuery  infoAction;
        ;
   
        if (rentalDate
        && this.RORRentalDateTimesHost::isWorksheetTable()
        && this.hostHeadingLineLevel() == HeadingLine::Line)
        {
            if (!calendarId)
            {
                calendarId = this.getHostBuffer().calendarId;
            }
   
            if (calendarId)
            {
                workCalendarDate = WorkCalendarDate::RORfind(calendarId, rentalDate);
   
                if (!workCalendarDate)
                {
                    query = new Query();
                    query.addDataSource(tablenum(WorkCalendarTable)).addRange(fieldnum(WorkCalendarTable, CalendarId)).value(queryValue(calendarId)) ;
   
                    infoAction = SysInfoAction_FormrunQuery::newFormnameQuery(formstr(WorkCalendarTable), query);
                    ret = checkFailed(strFmt("@DNR3262", calendarId, rentalDate), '', infoAction);
                }
            }
        }
   
        return ret;
    }


(or)

 private static boolean dateIsOpen(CalendarId _calendarId, TransDate _transDate, workCalendarSched _workCalendarSched = null)
    {
        WorkCalendarSched workCalendarSched = _workCalendarSched ? _workCalendarSched : new WorkCalendarSched(true);
        ;
    
        return workCalendarSched.isDateOpen(_calendarId, _transDate);
    }


Get no.of working days in selected calendar

static void WorkingdaysInPeriod_WD(Args _args)
{
    WorkCalendarSched workCalendarSched;
   date start;
   date end;
   counter workingdays;
   counter totaldays;
   CalendarId primCalendar="Standaard";
   ;
   start=str2date("1-11-2014",123);
   end= str2Date("1-12-2014",123);
    workCalendarSched = new workCalendarSched();
    while(start<end)
   {
    totaldays++;

       if(workCalendarSched.isdateopen(primCalendar,start)==true)
           {
               workingdays++;
           }
        start++;
    }
    info(strfmt("Total days: : %1",totaldays));
    info(strfmt("Total working days: : %1",workingdays));
}

Friday, 28 September 2018

Content Place holder in SSRS

Let’s say you want to mix formats of a single textbox on a SQL Server Reporting Services report, as follows:
        SplitFormatting_Heading
Different formats could include mixing font sizes, colors, and other things like bold and italics within one textbox.  The easiest way to handle different formatting is to split it into 2 textboxes.  However, you may have a need to stay within one textbox depending on the string that needs to be concatenated, or to avoid alignment issues with other textboxes.  Within one textbox, I’ve found 3 ways to format specific text, numbers, fields, or expressions:
      1.  Selected Text Properties
      2.  Placeholder Properties and Text Properties Panes
      3.  HTML Tags (which also involves Placeholder Properties)
The remainder of this entry discusses each of the 3 methods.  This technique applies only to SSRS 2008, R2, and Report Builder 3.0.  SSRS 2008 R2 is used for the examples shown.

Selected Text Properties

This is the most straightforward technique, and should be familiar as it’s used throughout many Microsoft applications.  After you highlight a portion of the textbox, you may use the toolbar or the Properties Pane which will have “Selected Text” as the object name. The key to making this work is you need a simple expression, rather than a complex expression in the design view (i.e., make sure the design view does not show just <Expr> for the entire textbox - within part of it is okay though - see "A Word About <Expr>" toward the end of this entry).
SplitFormatting_HighlightText
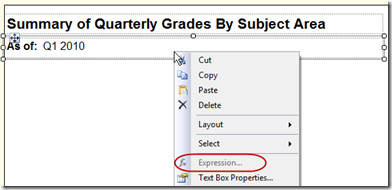
Note that after mixed formatting is applied, if you right-click the textbox, the Expressions option is no longer available:
SplitFormatting_NoExprOption
Next let’s get into the more interesting capabilities.

Placeholder Functionality

Placeholders were introduced in SSRS 2008 to accomplish the very goal we have.  As with the previous technique, this relies on a simple expression, rather than a complex expression in the design view (i.e., make sure the design view does not show just <Expr> for the entire textbox - within part of it is okay though - see "A Word About <Expr>" toward the end of this entry).  A simple expression will show our sample field as [@ParamQtrEnd] instead of =Parameters!ParamQtrEnd.Value.  More information on simple versus complex expressions can be found in the Understanding Simple and Complex Expressions article on MSDN. 
Just where are Placeholder Properties?  In the design GUI, the Placeholder Properties are not available through the right-click menu for the textbox.  You need to click twice inside a textbox (i.e., activate your cursor within the textbox) and then right-click to see this menu item.
  • If there’s nothing in the textbox yet:  you’ll see Create Placeholder in the menu.
           SplitFormatting_CreatePlaceholder
  • If you highlight a field:  you’ll see Placeholder Properties in the menu.
           SplitFormatting_PlaceholderProperties
  • If you highlight text:  you’ll see Text Properties in the menu.
          SplitFormatting_TextProperties
The Placeholder Properties pane offers different tooltip, formatting, and action for the text selected in the textbox.  The Text Properties pane offers the same options, with one exception:  it doesn’t have the Number page of options since it’s only formatting text.
SplitFormatting_PlaceholderPropertiesPane
Use the various options to specify formatting desired for the selected portion of the textbox.  You may use several combinations of Placeholder Properties and Text Properties within one single textbox.  Valentino Vranken has a very nice discussion on his blog entry:  The Power of the Placeholder.

HTML Tags

This option delivers a bit more flexibility, particularly if you have a complex expression in your textbox.  Using HTML tags will work if you have a complex expression (i.e., <Expr> shown in the design view).
First, you do need to define Placeholder Properties on the Expression:
SplitFormatting_PlaceholderPropertiesForExpr
Within the Placeholder Properties, change the default Markup type to be “HTML – Interpret HTML tags as styles.”  If you forget to change this radio button, then the html tags will be rendered as literal text.
SplitFormatting_PlaceholderPropertiesHTMLRadioBtn
Then within your expression, insert the HTML tags as needed.
SplitFormatting_HTMLInExpression
Only a subset of HTML tags are supported within SSRS, such as bold, italics, and underline.  The MSDN page on Formatting Text and Importing HTML specifies the valid HTML tags you may use within an SSRS textbox.  If you use an HTML tag that isn’t supported in SSRS, it will be ignored.
As a sidenote, using HTML tags within a simple expression will work as well:
SplitFormatting_HTMLInPlaceholder
However, in a real situation, I would reserve using HTML tags to situations when I have a complex expression.  With a simple expression, I’d opt to keep the formatting options simpler.

A Word About <Expr>

Above I stated a couple of times that you can't have just <Expr> for the entire textbox and have the placeholder technique work, except for the HTML tags method.  However, an <Expr> inside part of the textbox will still work.  An example to illustrate:
What won't support partial formatting (except using HTML tags):
Will support partial formatting (using any of the methods discussed above):

Summary

Reporting Services 2008 introduced enhanced rich text functionality to permit mixed formatting, or even mixed tooltips & actions, within a single textbox.  There’s several ways mixed formatting can be accomplished.  Placeholder Properties can be used with the GUI formatting options, or with a subset of HTML tags.  The GUI formatting options work best with simple expressions, whereas the HTML options provide a lot of flexibility for complex expressions