Friday, 7 August 2015

Arrival Create Journal From Arrival Overview and Posting

Functional Process:

To Get Lines in to Arrival Overview - we need to Create Purchase order.

Create Arrival journal(s) from Arrival overview form

1.       User navigates to Stock management / Periodic / Arrival overview
2.       On Arrival overview form,
a.       On Setup tab user sets new ‘Arrival journal per purchase order’ checkbox to ‘yes’
b.       On Overview tab user adjusts range as needed, and selects ‘Update’
3.       On same Arrival overview form, in Receipts section lines are displayed based on previously defined filter criteria ( set – Days Back : 2000 if you want data – click update)
4.       User selects lines (mark them in column ‘Select for arrival’), and calls function ‘Start arrival’
5.       AX prompts user about Arrival journal(s) being created

Register Delivered items on Arrival journal, and post journal

1.       User navigates to Stock management / Journals / Item arrival
2.       Item arrival form opened, user selects journal, and click on ‘Lines’ button.
3.       Journal lines form opened, providing information about:
4.       Click ‘Post’
5.       Posting dialog box displayed. If the user posts an arrival journal with discrepanc

Technical Overview :

Create Arrival journal(s) from Arrival overview form

>>\Forms\WMSArrivalOverview\Designs\Design\[Tab:Tab]\[TabPage:OverviewTabPage]\[Group:ExpectedReceipts]\[Group:OverviewGroup]\[ActionPane:ActionPane]\[ActionPaneTab:ActionPaneTab]\[ButtonGroup:ButtonGroup]\Button:StartArrivalButton\Methods\clicked

>> Classes\ WMSArrivalStart::startArrival

>> Classes\ WMSArrivalStart\run

wmsArrivalCreateJournal.createWMSJournalTrans(wmsArrivalDetailTmpLocal);  - Journal is created by looping all the selected lines in Lines grid.

>>Classes\WMSArrivalCreateJournal\ createWMSJournalTrans
Line no : 34  - Creates journal header
if (!wmsJournalTable.RecId)
    {
        this.createWMSJournalFromTmp(_wmsArrivalDetailTmp);
    }

Line no  : 52 – Create Journal Lines.

numberOfLines += this.createWMSJournalTransFromTmp(_wmsArrivalDetailTmp);

Post Item Arrival Journal : 

Classes \ WmsJournalCheckPostReception\run
Classes \ WMSJournalCheckPost\main
Classes\ JournalCheckPost\postjournal
 Some Learnings about Classes \JournalCheckPost :
Classes\JournalCheckPost\runEnd – then itself Journal status is updated as posted.
Classes \ WmsJournalCheckPostReception\run  - After Super() – We can make any process that should be done after posting …( Method can be overrided, as it do not exist).
X++ code to create a Item Arrival Journal :

Classes \ WmsJournalCheckPostReception\run   - Get Journal Id through
this.parmJournalId()

Requirements / Modifications :

Create Arrival journal(s) from Arrival overview form

Need to Create separate journals for different Orders
Customization required :
while select wmsArrivalDetailTmpLocal
        where wmsArrivalDetailTmpLocal.Selected   == NoYes::Yes
        &&    wmsArrivalDetailTmpLocal.InventQty  >  0
    {
        find    =   conFind(con,wmsArrivalDetailTmpLocal.InventTransRefId);
        if (!find)
        {
            con = conIns(con,i,wmsArrivalDetailTmpLocal.InventTransRefId);
            i++;
        }
    }
Get all different order ids and loop it by setting Invent TransRefId as range
while select wmsArrivalDetailTmpLocal
            where wmsArrivalDetailTmpLocal.Selected   == NoYes::Yes  // Existing
            &&    wmsArrivalDetailTmpLocal.InventQty  >  0
            && wmsArrivalDetailTmpLocal.InventTransRefId    ==  refrenceId // Add this line as range

Post Item Arrival Journal : 

Need to add new parameter on the post , Based on that we need to create new journal on some validated conditions

In post Dialog Add one more parameter along with Transfer all posting errors to a new journal :

Customization :

1)       Need to add Parm method
2)       Show this field only for Arrival posting : Classes\JournalCheckPost\dialog
wmsjournaltable =   WMSJournalTable::find(journalId);
        if(wmsjournaltable.journalType  ==  WMSJournalType::Reception)
            dialogTransferRemainingQty  = dialog.addField(extendedTypeStr(StockJournalTransferRemainingQuantity));


3)       Need to add the field in Macro – to maintain the value in cache -modify in Unpack and Classdeclaration ( If any error, just remove cache and usage data).
4)       Set parm method in Classes\JournalCheckPost\getFromDialog

Create a new Item Arrival Journal Through code : 

private void CreateArrivalJournal(JournalId _journalId)//JournalTransList _journalTransList)
{
        WMSJournalTable         fromJournalTable,toJournalTable;
        WMSJournalTrans         fromJournalTrans,toJournalTrans;
        str                     journalNum,journalName;
        int                     lineNum = 1;
        NumberSeq               numberSeq;
        WMSJournalName          wmsJournalName;
    ;
        if(this.chkRemaingQtyPerJournal(_journalId))
    {
        select * from fromJournalTable
            where fromJournalTable.journalId    ==  _journalId;

        numberSeq = NumberSeq::newGetNum(WMSParameters::numRefWMSJournalId());
        journalName = WMSParameters::find().receptionJournalNameId;
        journalNum = numberSeq.num();
        wmsJournalName = WMSJournalName::find(journalName);
        ttsbegin;
        toJournalTable.initFromWMSJournalName(wmsJournalName);

        toJournalTable.JournalNameId        =   journalName;
        toJournalTable.JournalId            =   journalNum;
        toJournalTable.journalType          =   WMSJournalType::Reception;

        toJournalTable.inventDimId = InventDim::inventDimIdBlank();
        toJournalTable.insert();
        while select fromJournalTrans
            where fromJournalTrans.journalId    ==  _journalId
        {
            //Condition whether to insert or not the lines
            {
                    toJournalTrans.clear();
                    toJournalTrans.initFromWMSJournalTable(toJournalTable);
                    toJournalTrans.JournalId                =   journalNum;
                    toJournalTrans.LineNum                  =   lineNum;
                    toJournalTrans.TransDate                =   today();
                    toJournalTrans.ItemId                   =   fromJournalTrans.ItemId;
                    toJournalTrans.Qty                      =   fromJournalTrans.StockExpectedQuantity - fromJournalTrans.qty;
                    toJournalTrans.InventDimId              =   fromJournalTrans.InventDimId;
                    toJournalTrans.vendAccount              =  fromJournalTrans.vendAccount;
                    toJournalTrans.inventTransType          =   fromJournalTrans.inventTransType;
                    toJournalTrans.inventTransRefId         =   fromJournalTrans.inventTransRefId;
                    toJournalTrans.inventTransId            =   fromJournalTrans.inventTransId;
                    toJournalTrans.checkPickingLocation     =   NoYes::No;
                    toJournalTrans.createQuarantineOrder    =   NoYes::No;
                    toJournalTrans.inventDimId              =   fromJournalTrans.InventDimId;
                    toJournalTrans.StockExpectedQuantity    =   fromJournalTrans.qty;
                    toJournalTrans.insert();
                    lineNum++;
            }
        }
    ttscommit;       
         info(strFmt("@SYS58788", journalNum));
    }

}


Tuesday, 7 July 2015

Sys operation Framework

https://amazingax.wordpress.com/2012/12/28/simple-use-of-sysoperation-framerwork-in-ax-2012-part-1datacontract/
https://amazingax.wordpress.com/2012/12/29/microsoft-dynamics-ax-2012simple-use-of-sysoperation-frameworkpart-2attribute-based-customization-and-code-based-customization-using-uibuilder-class/
https://amazingax.wordpress.com/2013/01/05/microsoft-dynamics-ax-2012simple-use-of-sysoperation-frameworkpart-3sysoperationservicecontroller-class/

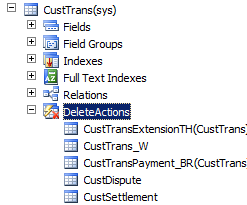
Delete Functions


Use of Cascade, Restricted and Cascade +Restricted (Delete action property for a table)
image018
Example of Cascade
Suppose we have two tables  (Customer & Order) and the relation is of One-To-Many i.e. Customer can have many orders
So on a parent table i.e.(Customer) if I set a delete action property to “CASCADE” for Order table. Then If I go and delete the record from a Customer table. It will also delete all the related records in Order table automatically
Example of Restricted
Suppose we have two tables  (Customer & Order) and the relation is of One-To-Many i.e Customer can have many orders
So on a parent table i.e.(Customer) if I set a delete action property to “RESTRICTED” for Order table. Then If I go and delete the record from a Customer table. It will first check the record in the child table and if exist that warning prompt saying that first we need to delete a record from child table.
Example of Cascade + Restricted
Suppose we have three tables  (Person ,Customer & Order) Now Person is a parent of Customer table, and Customer is a parent of Order table having (One-To-Many) relations
If I set a Delete action property on Person table to “CASCADE” for customer table  and If I set a  Delete Action property on a CUSTOMER table for Order table to “CASCADE +RESTRICTED”.
So if I delete a record from Customer table then It will first check the record in the child table(order table) and if exist that warning prompt saying that first we need to delete a record from child table.
But if I delete a record from Person table it will automatically delete a record in Customer table and all records related to customer table in Order table would also be deleted.

Monday, 6 July 2015

Add a Button For Document Handling on a new AX form

I) To add this functionality you may need to perform following steps. 

Step 1. Open your form in AOT and Go to from Design node. 

Step 2. Add new button group under ActivePanTab. 

Step 3. Add new command button under this new button group. 

clip_image001 

Step 4. Set following properties of this button 

clip_image002 

Now you need to do one functional setup for this new customization 

Step 5: Open below from 
 Organization administration/SetUp-> Document Management -> Active Document Table 

Step 6: Add your table details here and click on Always enable. 

clip_image003

Step 7: So its done now. 
Open your form and click on Attachment button , below form must open. 

clip_image006


II)   Add Menu Item and Pass Datasource :

1.Add a menu item Button in Button Group
2. Set Button Group Property Datasource - with Form Datasource ( main )
3. Attachment - Image ( 2505)
4. MenuItemType- Display
5. Menu ItemName-DocuView
6. Check the DocuRef table and your table is related with Refrecid and RefTableid.

Friday, 12 June 2015

Useful Codes

Index : 

1. To get new and old values in modified method of any table
2.
To get new and old values in Modified method of any table :

public void modifiedField(FieldId _fieldId)
{
if (fieldNum(SalesTable, ShippingDateRequested) == _fieldId)
    {
        str oldValue, newvalue;
        oldValue = this.orig().(_fieldId);
       newvalue = this.(_fieldId);
     info(strfmt("Field number %1 changed from %2 to %3",_fieldId,this.orig().(_fieldId),this.            (_fieldId)));
}

Thursday, 11 June 2015

Re- Use Jobs for Reference

Get all Customer Postal Address

static void CustPostalAdresses(Args _args)
{
    CustTable custtbl;
    LogisticsPostalAddress  postalAddress;
    DirPartyLocation partyLocation;
    custtbl =   CustTable::find("US-001",false);
   while  select  postalAddress
    exists join partyLocation
        where partyLocation.Location == postalAddress.Location
        //&& partyLocation.IsPrimary == true
        && partyLocation.Party == custtbl.party
    {

    info(strFmt("%1",postalAddress.RecId,postalAddress));
    }
}